Automating blogging workflow - Part Two
Mar 10, 2022 13:49 · 1322 words · 7 minute read
Introduction
In this second blog post of about the management of my site, I will go through the first iteration of improvements.
Background
In the first iteration, I decided to replace the deployment of the site from a local Makefile to GitHub Actions. In my view, GitHub Actions continues to improve at a rapid pace, and Microsoft’s investment into releasing features into the free offering makes it an attractive choice. Coupled with the fact that I’m using already using GitHub for version control, this is a natural fit.
Now that GitHub Actions would be used to deploy site changes, naturally uncommitted code can’t be deployed to the site using GitHub Actions. This meant that I would be (gleefully) forced into creating a branch to commit my changes to. Using some basic branch naming convention, I would now issue a pull request to myself for review.
This would also mean that I didn’t need Hugo or AWS Access Credentials on my local machine, which would also meet the goal of having no reliance on my local machine.
As with all my other public projects, all I need on my local machine is a version of Git, my GitHub access credentials and an IDE of choice. This greatly simplifies setup and reduces security concerns.
First Iteration Workflow
The end state at the end of the first iteration is shown below:
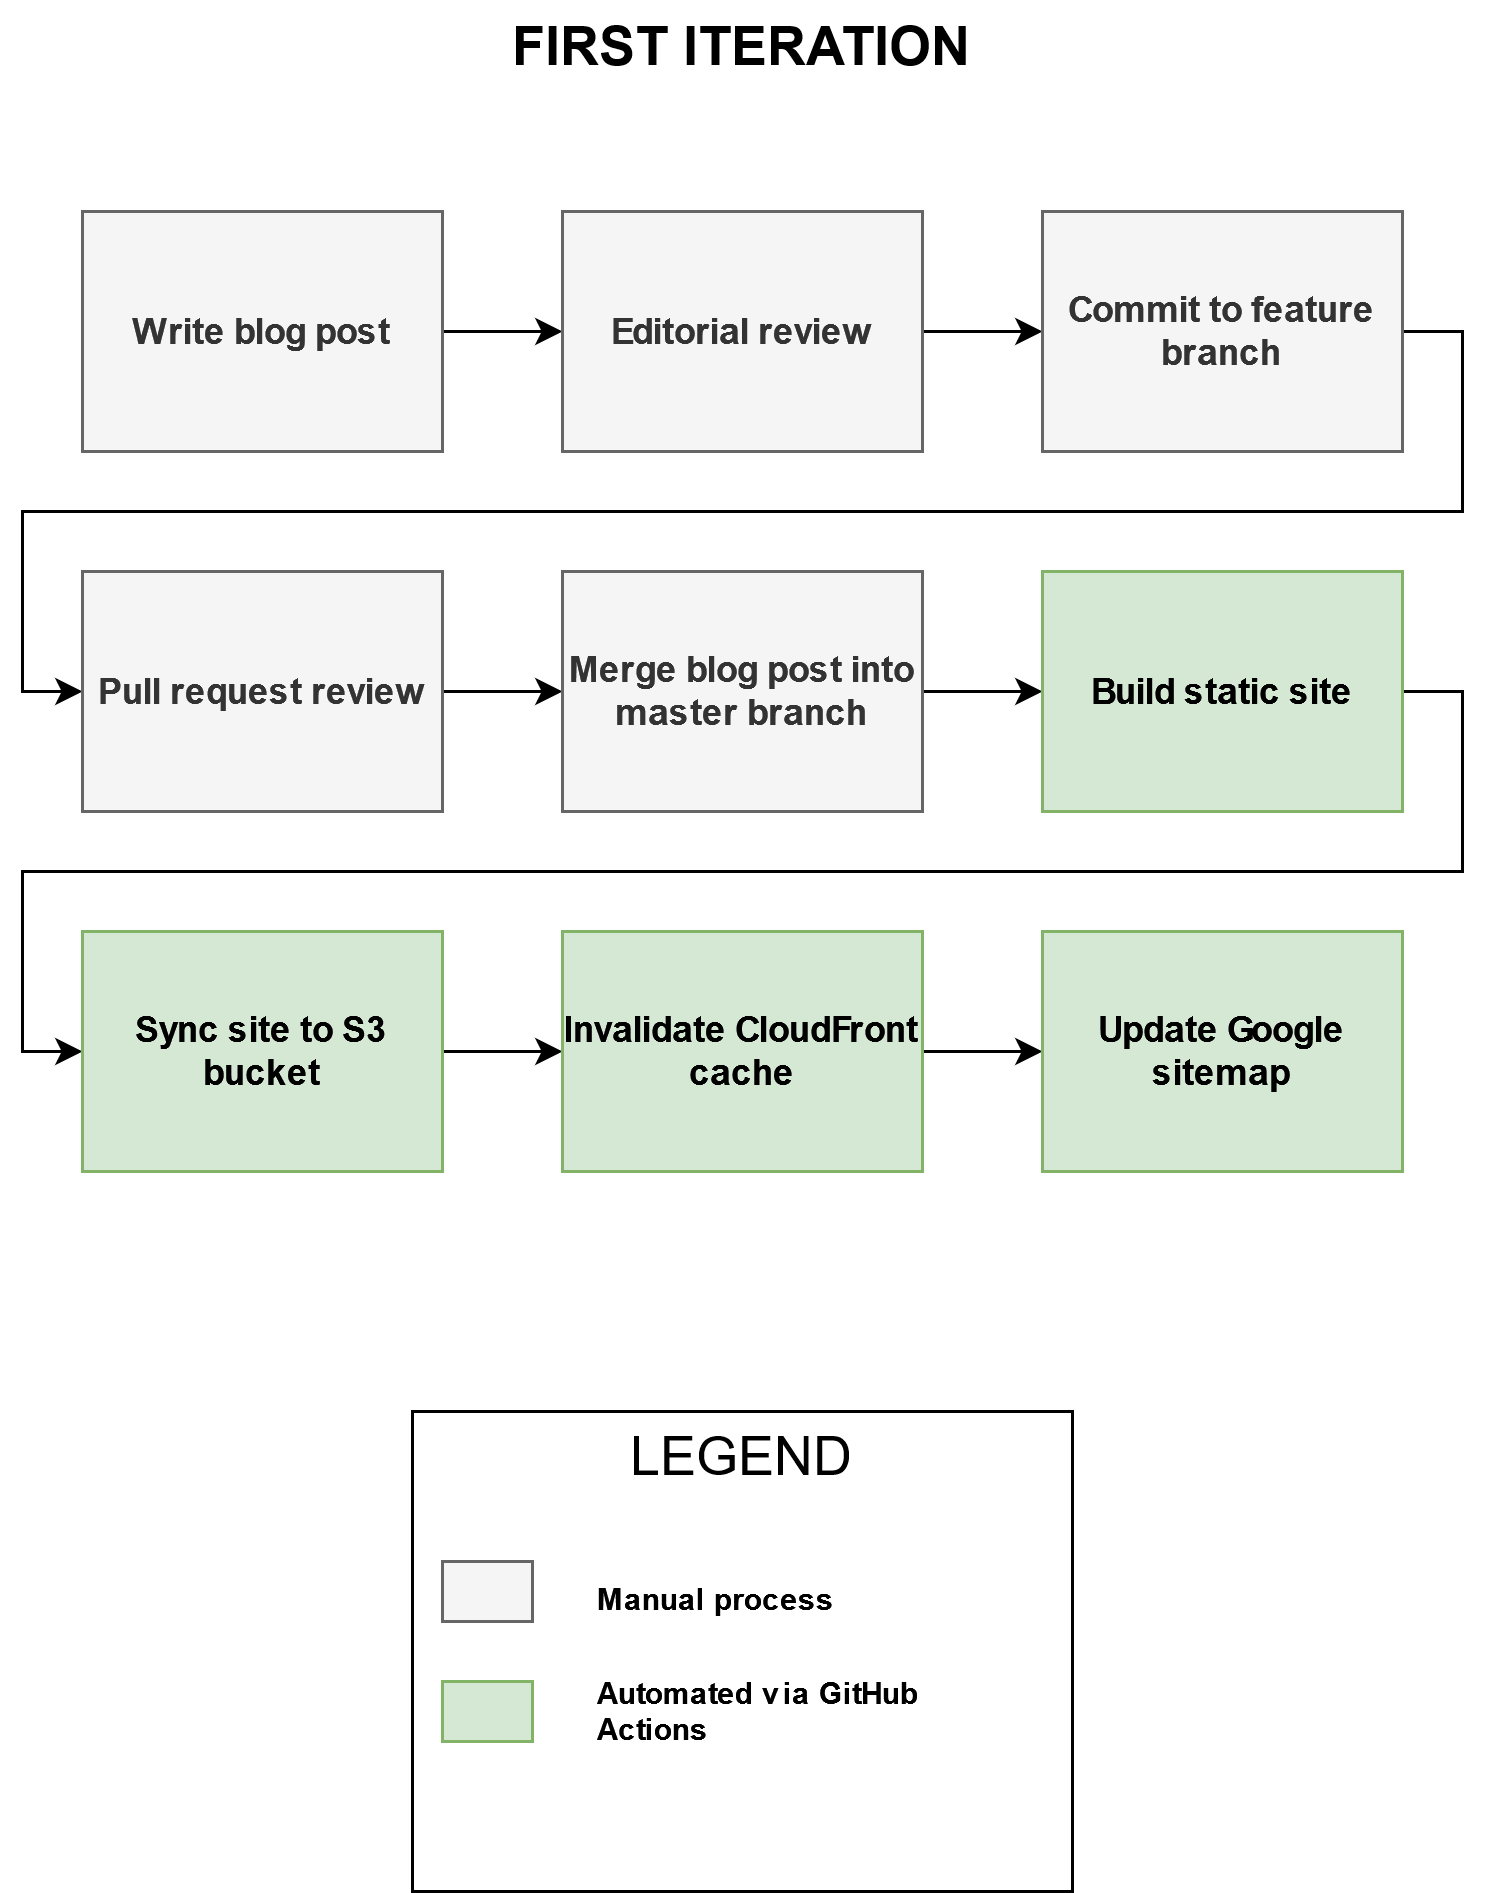
I will go through and describe the differences as compared to the initial workflow. Firstly, let’s start off with the manual steps.
Write blog post and editorial review
These steps remained unchanged from the initial workflow as highlighted in the first blog post.
Commit to feature branch
Once the blog post is ready for deployment, I commit the blog post to a feature branch. The branch name must meet the pattern of feature/*, which is essentially a regex pattern match.
Some valid examples are:
feature/sot-seriesfeature/nornir-toolkit
Some invalid examples are:
feature-sot-serieshotfix/nornir-typo
Pull request review
At this stage of the workflow, I can review and approve any changes made. Given the blog posts are Markdown files, they can be effectively reviewed and tracked using version control.
Although I am reviewing and approving my own blog posts, it’s still good practice to not directly commit to your main or master branch.
Merge blog post into master branch
After the pull request is approved, it can be merged into the master branch. Please note that the merge to master is going to be the event which triggers the GitHub Actions workflow.
Automated steps
As mentioned above, the build and deployment of my blog site as part of this first iteration is performed using GitHub Actions.
I will refer to snippets of code, so please use the copy on my GitHub repo which will display with line numbers included as a reference when following along:
---
name: Deploy Static Website

on:  # yamllint disable rule:truthy
    push:
        branches:
            - master

jobs:
    build:
        name: Build and Deploy
        runs-on: ubuntu-latest
        steps:
            - uses: actions/checkout@v2
              with:
                  submodules: recursive
            - name: Install Hugo
              run: |
                  HUGO_DOWNLOAD=hugo_extended_${HUGO_VERSION}_Linux-64bit.tar.gz
                  wget https://github.com/gohugoio/hugo/releases/download/v${HUGO_VERSION}/${HUGO_DOWNLOAD}
                  tar xvzf ${HUGO_DOWNLOAD} hugo
                  mv hugo $HOME/hugo
              env:
                  HUGO_VERSION: 0.71.0
            - name: Build Website
              run: $HOME/hugo -v
            - name: Configure AWS Credentials
              uses: aws-actions/configure-aws-credentials@v1
              with:
                  aws-access-key-id: ${{ secrets.AWS_ACCESS_KEY_ID }}
                  aws-secret-access-key: ${{ secrets.AWS_SECRET_ACCESS_KEY }}
                  aws-region: ${{ secrets.AWS_S3_BUCKET_REGION }}
            - name: Copy blog files to s3 bucket
              run: |
                  aws s3 sync --acl "public-read" public/ ${{ secrets.AWS_S3_BUCKET }}
            - name: Update Google sitemap
              run: |
                  curl --silent ${{ secrets.SITEMAP_URL }}
            - name: Invalidate CloudFront cache
              run: |
                  aws cloudfront create-invalidation --distribution-id ${{ secrets.AWS_CLOUDFRONT_ID }} --paths "/*"
            - name: Update Google sitemap
              run: |
                  curl --silent ${{ secrets.SITEMAP_URL }}
On line 2, I provide the name of the workflow, so that it can be differentiated from other workflows within the repo. Feel free to adjust this as needed.
---
name: Deploy Static Website
In lines 4 to 7, I am specifying the event which triggers this workflow:
on:  # yamllint disable rule:truthy
    push:
        branches:
            - master
As you may guess, this workflow won’t be triggered on a push to any other branch than the name master.
Multiple variations of events and conditions can be set to suit your need, and in the final iteration we will see another example.
In lines 9 to 10, we’re configuring GitHub Actions to run the job named build. If you have complex sequencing, you could add this here. However, I only need the workflow with a single job:
jobs:
    build:
In lines 11 to 14, we’re configuring GitHub Actions checkout the repo on a ubuntu-latest runner. If you’ve seen GitHub Actions files before, this is a standard pattern. However, lines 15 to 16 ensures that the runner also recursively include the Hugo theme for my website.
        name: Build and Deploy
        runs-on: ubuntu-latest
        steps:
            - uses: actions/checkout@v2
              with:
                  submodules: recursive
Now, we’ve cloned the repo and have cloned the appropriate Hugo theme, we’re ready to build and deploy the site.
Build static site
To build the site using a GitHub Actions runner, we need to download and install Hugo and then build the site.
Firstly, from lines 17 to 24, we’re downloading and installing Hugo:
            - name: Install Hugo
              run: |
                  HUGO_DOWNLOAD=hugo_extended_${HUGO_VERSION}_Linux-64bit.tar.gz
                  wget https://github.com/gohugoio/hugo/releases/download/v${HUGO_VERSION}/${HUGO_DOWNLOAD}
                  tar xvzf ${HUGO_DOWNLOAD} hugo
                  mv hugo $HOME/hugo
              env:
                  HUGO_VERSION: 0.71.0
Finally, from lines 25 to 26, we’re building the site in verbose mode so we’ve a full log of the build, in case we run into any issues:
            - name: Build Website
              run: $HOME/hugo -v
Sync site to S3 bucket
Prior to synchronising the Hugo site to the S3 bucket so it can be served, we need to setup AWS credentials. These same credentials will be used to invalidate the CloudFront cache as well.
From lines 27 to 32, we configure the runner with the AWS credentials and the AWS region:
            - name: Configure AWS Credentials
              uses: aws-actions/configure-aws-credentials@v1
              with:
                  aws-access-key-id: ${{ secrets.AWS_ACCESS_KEY_ID }}
                  aws-secret-access-key: ${{ secrets.AWS_SECRET_ACCESS_KEY }}
                  aws-region: ${{ secrets.AWS_S3_BUCKET_REGION }}
Note that on lines 32 to 34, I am using expressions to programmatically set the credentials and region needed.
In addition to this, I am using encrypted secrets to set these values. At the conclusion of breaking down this file, I will show how those are set.
Now that the credentials are set, in lines 33 to 35, we’re using the AWS Command Line Interface to synchronise the site to the S3 bucket:
            - name: Copy blog files to s3 bucket
              run: |
                  aws s3 sync --acl "public-read" public/ ${{ secrets.AWS_S3_BUCKET }}
Invalidate CloudFront cache
After the files are successfully copied, in lines 36 to 38, we invalidate the CloudFront cache:
            - name: Invalidate CloudFront cache
              run: |
                  aws cloudfront create-invalidation --distribution-id ${{ secrets.AWS_CLOUDFRONT_ID }} --paths "/*"
Update Google sitemap
Finally, in lines 39 to 41, I notify Google that a new copy of my site map is available.
            - name: Update Google sitemap
              run: |
                  curl --silent ${{ secrets.SITEMAP_URL }}
Encrypted secret storage
As mentioned above, secrets are passed into the runner at runtime. In the diagram below, you can see the secrets configured on the repository:
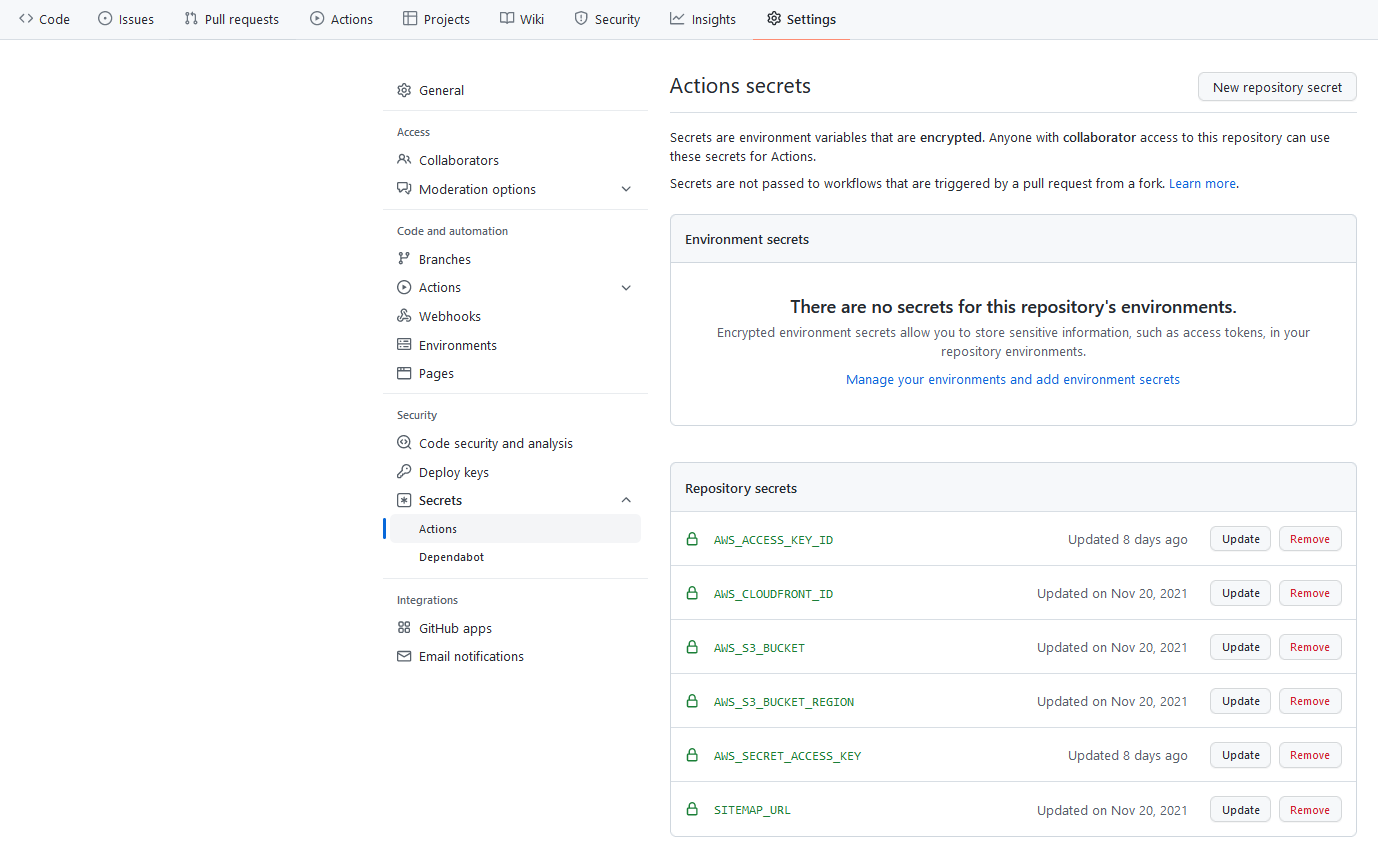
For more information on encrypted secrets, you can consult the documentation.
Build and Deploy Workflow
Now that the entire file has been explained, below is the screenshot of the job running successfully:
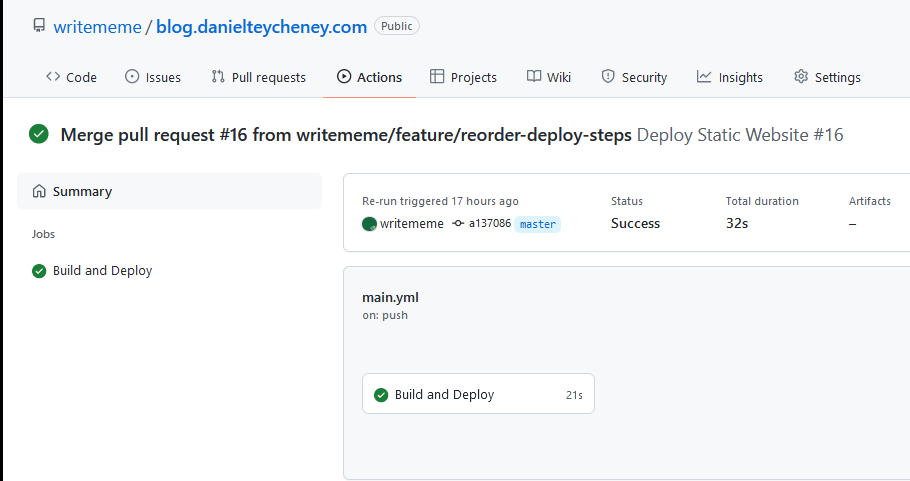
We can drill into the job and look at the steps at a high level, or even look at the detail of a particular step:
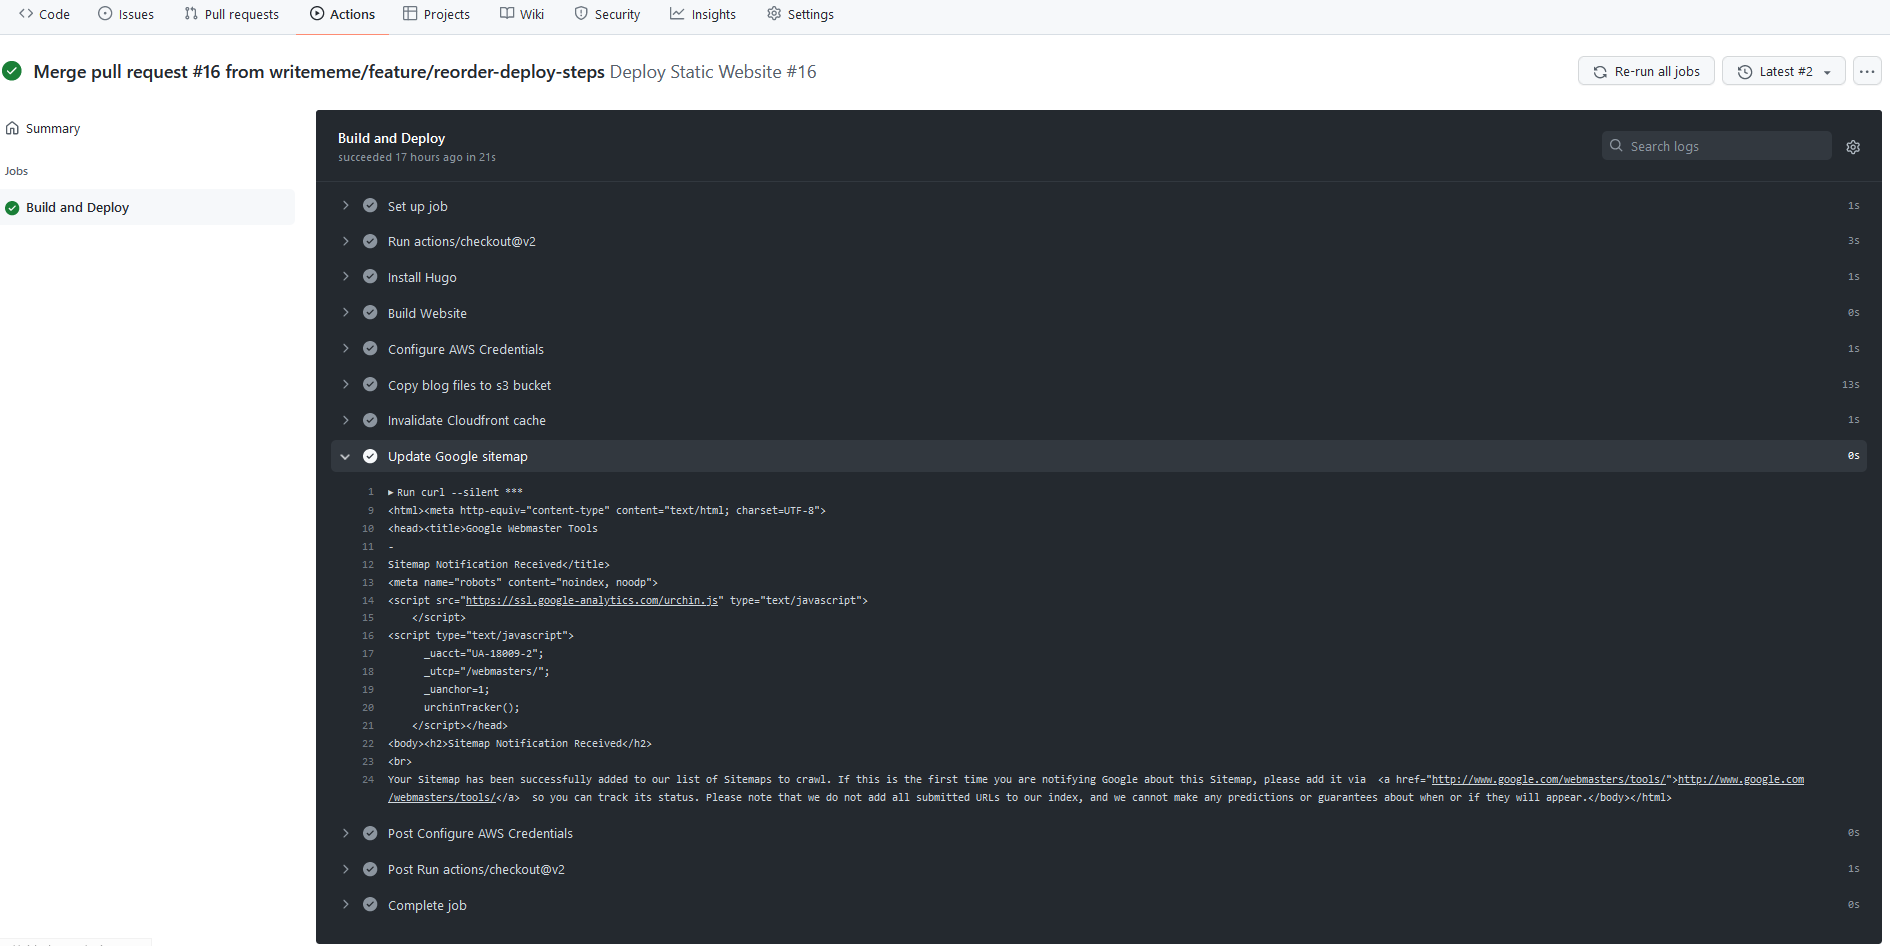
You can view the full history of the workflow at this link.
Conclusion
In this first iteration, we’ve successfully automated the build and deployment of the site using GitHub Actions. In addition to this, we’ve ensured that deployments are only made from the master branch and that those changes should be reviewed via a pull request.
We now no longer need local copies of AWS credentials, and have securely stored and passed those credentials in a secure manner.
In the next blog post, we will address the final iteration of the workflow.